


To create a Facebook photo album, open Facebook, go to your profile and Photos/Albums area, and choose the option to create an album when it is available. Add your photos, give the album a clear name, choose the appropriate audience, arrange or caption the images if needed, and publish it. On the current Facebook app, another common route is to start a photo upload, select multiple images, tap Next, then use + Album to add the photos to an existing album or create an album.
Facebook photo albums are useful when several images belong together. Instead of publishing every picture as a separate post, you can organize related photos into a collection such as Summer Vacation 2026, Birthday Celebration, Wedding Photos, Product Launch, or Company Event.
The process is straightforward, but Facebook’s interface has changed over time. Older tutorials often tell users to follow a single fixed path through Profile → Photos → Albums → Create Album, while Meta’s current help documentation also shows a photo-upload workflow where users can select multiple photos and tap + Album.
This guide covers both approaches so you can use the route that appears on your account.
What Is a Facebook Photo Album?
A Facebook photo album is a collection of photos or other supported media organized around a common theme, event, person, place, or purpose.
For example, you might create albums for:
- A family vacation
- A wedding or birthday
- A school or university event
- A business conference
- Product photographs
- Behind-the-scenes content
- A portfolio project
- Travel destinations
- Personal memories
An album is different from simply uploading several photos to a normal post. A multi-photo post can display several images together in the Feed, while an album is intended to organize related media into a collection that can be revisited through Facebook’s photo and album areas.
What Can You Add to an Album?
Depending on the Facebook interface and account type, album-related tools may allow you to work with:
- Multiple photos
- Captions
- Tags
- Locations
- Album names
- Album descriptions
- Audience or privacy settings
- Additional photos after publication
Meta’s current photo-sharing instructions specifically show options for adding multiple photos, adding them to an album, tagging people, adding a location, and editing photos before posting.
Why Are Facebook Photo Albums Useful?
Facebook albums are useful because they give related images a clear structure instead of scattering them across separate uploads.
A personal user might use an album to preserve a complete vacation or family event. A photographer might organize images from a particular event. A business could group photographs from a product launch, trade show, office event, or customer activity.
Main Benefits of Facebook Albums
- Organization: Related photos stay together.
- Easy browsing: Viewers can explore several related images in one place.
- Better context: An album title can explain what the collection represents.
- Simpler sharing: You can direct people to a collection rather than many individual uploads.
- Content management: Older photos are easier to find when they have meaningful album names.
- Storytelling: The order and selection of images can communicate an event or experience.
- Privacy control: Facebook provides audience controls for content, although the exact options can depend on the content and account.
For businesses and creators, albums can also provide a more organized visual archive. However, you should not assume that creating an album automatically increases reach or engagement. Performance depends on the content, audience, distribution, and Facebook’s recommendation and ranking systems.
How Do Facebook Photo Albums Work?
The basic workflow is:
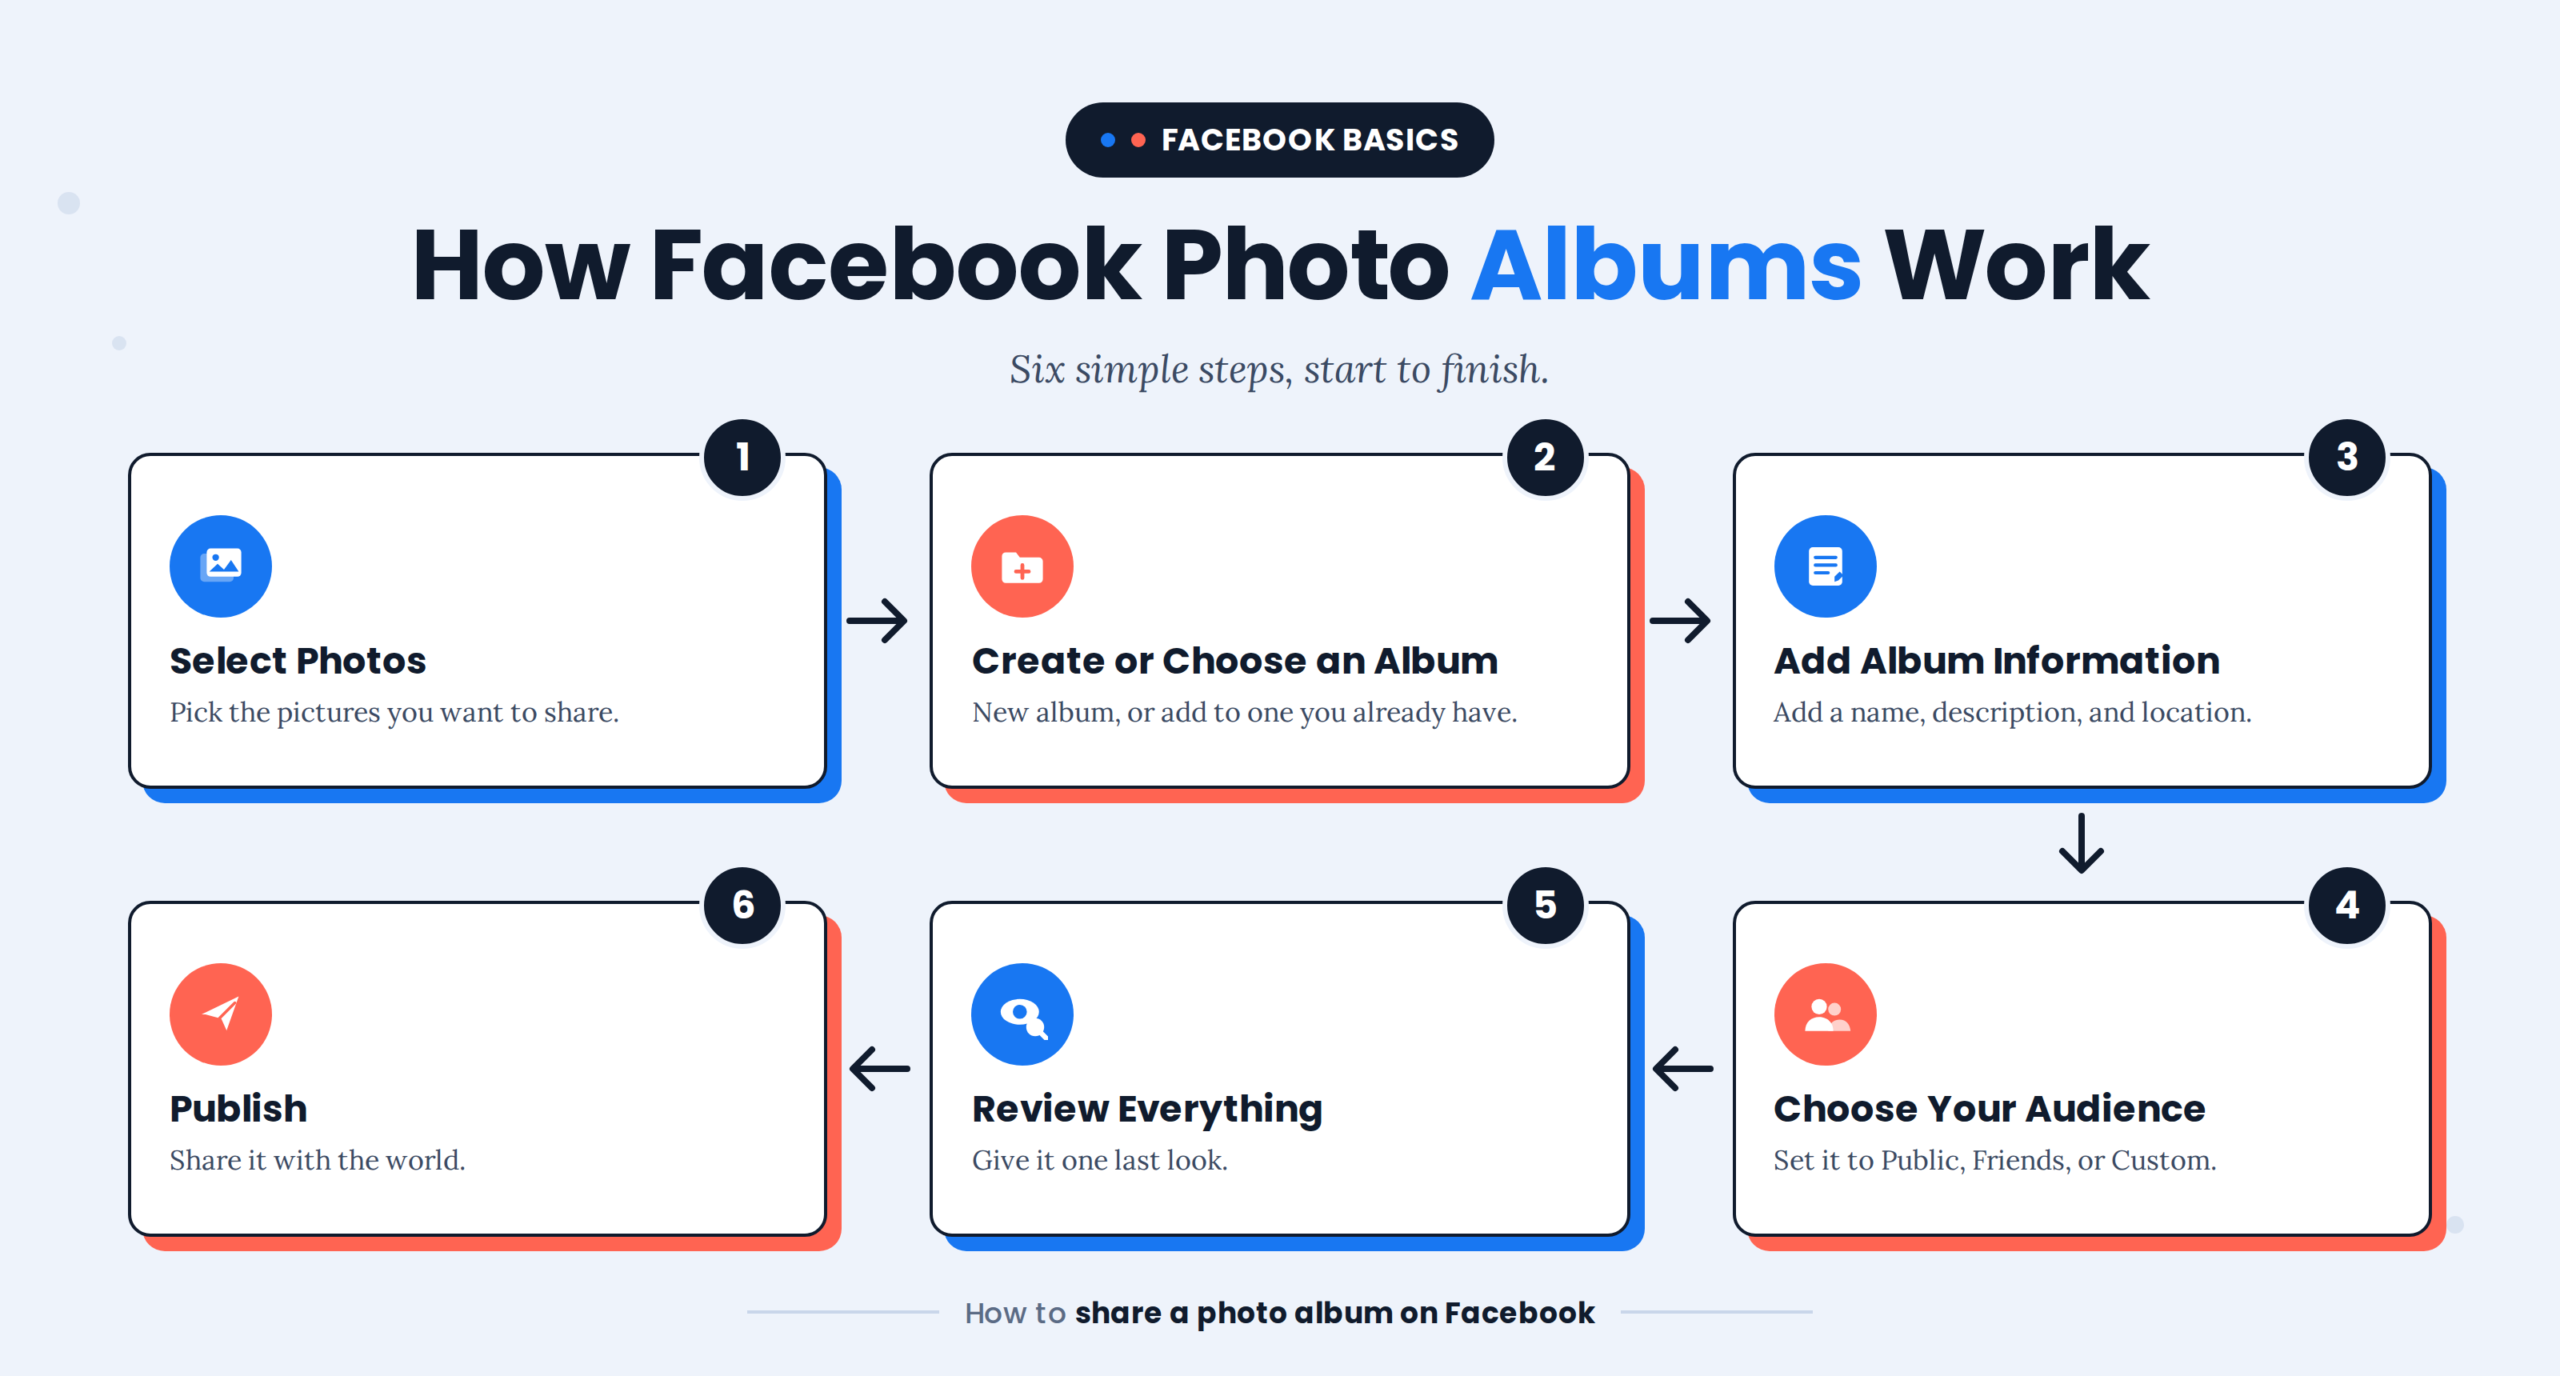
The important distinction is that Facebook may now present album creation as part of the normal photo-upload process. Meta’s official instructions currently say that after selecting photos and tapping Next, users can tap + Album to add the photos to or create an album.
This means you should not worry if your app does not exactly match an older tutorial showing a permanent Create Album button.
Album vs. Multi-Photo Post
| Feature | Photo Album | Multi-Photo Post |
|---|---|---|
| Groups related photos | Yes | Yes |
| Designed as an organized collection | Yes | Not primarily |
| Album name | Yes | No separate album required |
| Useful for long-term photo organization | Yes | Limited |
| Appears as a normal Feed post | Can be shared/promoted through Facebook | Yes |
| Best for | Events, collections, archives | Quick updates and announcements |
The best choice depends on your goal. If you simply want to show several pictures in today’s post, a multi-photo post may be enough. If you want the images organized as a reusable collection, an album is generally more appropriate.
Before You Start
Before creating the album, prepare the photos and decide how you want people to see them.
Choose a Clear Album Theme
Try to keep the photos connected by one obvious idea.
Good examples include: Paris Trip — June 2026, Sarah’s Birthday Party, Summer Family Vacation, Product Launch Photos and Company Annual Event 2026.
Avoid combining unrelated images just because they were all taken around the same time.
Prepare the Photos
Select the photos you actually want people to see. Remove duplicates, accidental screenshots, blurry images, and unrelated pictures before uploading.
This is especially useful on mobile because selecting dozens of unnecessary images can make the upload slower and make the finished album harder to browse.
Check Facebook’s Photo Permissions
If Facebook cannot access your phone’s pictures, you may not be able to select the images you want.
Meta says photo sharing from a device requires Facebook to have access to the device’s camera roll, and the permissions available can allow access to all photos or selected photos.
Decide Who Should See the Album
Think about privacy before publishing.
For example:
- Personal family photos → Friends or a more restricted audience
- Private reference collection → Only Me, where available
- Public photography portfolio → Public, if appropriate
- Business event → Audience appropriate for the Page/profile and content
Facebook’s privacy controls are managed through its broader audience and visibility settings, and available options can vary depending on the profile and content.
How to Create a Facebook Photo Album on a Computer
Creating and managing albums from a desktop browser can be convenient because selecting many files is easier with a keyboard and mouse.
Step 1 — Log In to Facebook
Open Facebook in your preferred desktop browser and sign in to the account that should own the album.
Once your Feed loads, open your profile by selecting your name or profile picture.
Step 2 — Open Your Photos
Go to the Photos area of your profile.
Depending on the current interface, you may see categories or tabs for your uploaded photographs and albums.
Look for Albums if it is displayed.
Step 3 — Look for the Album Creation Option
If Facebook displays Create Album, select it.
The exact location can vary, so do not assume that the button will be in precisely the same place shown in an older screenshot.
Another route is to start creating a photo post and use Facebook’s album-related option if it appears.
Step 4 — Select Your Photos
Choose the photographs you want to include.
On Windows, you can usually select multiple files with Ctrl + click or select a range with Shift + click. On macOS, use Command + click for individual selections.
After choosing the images, confirm the upload.
Step 5 — Give the Album a Name
Use a title that immediately explains the collection.
For example:
London Trip — September 2026
is more useful than:
My Photos
A descriptive title makes the album easier to understand later.
Step 6 — Add Optional Information
If Facebook provides a description field, use it to add useful context.
For an event album, you might mention:
- Event name
- Date
- Location
- Short description
- Relevant context
Keep it concise. The description should help visitors understand the collection rather than repeat the title.
Step 7 — Choose the Audience
Review the audience setting before publishing.
Do not automatically choose Public just because the photos are harmless. Consider whether the album contains:
- Children
- Family members
- Private locations
- Home addresses
- Travel details
- Personal documents
- Work information
Facebook provides privacy controls for posts and other content through its audience and visibility settings.
Step 8 — Review the Photos
Before publishing, check:
- Are all selected photos relevant?
- Are any images duplicated?
- Are any photos blurry?
- Is the order logical?
- Is the album name correct?
- Is the audience correct?
- Are captions or tags necessary?
This final review prevents many problems that are harder to correct later.
Step 9 — Publish the Album
Select the available Post, Publish, or equivalent confirmation button.
Wait for the upload to finish.
Do not close the browser immediately if the photos are still uploading.
How to Create a Facebook Photo Album on iPhone
The Facebook iPhone app can use a photo-sharing workflow rather than exactly the same album-navigation path shown in older desktop tutorials.
Step 1 — Open the Facebook App
Launch the Facebook app on your iPhone and make sure you are signed into the correct account.
Step 2 — Start a Photo Upload
From your Feed, tap the Photo option.
Meta’s current help documentation says that users can select photos from their device’s camera roll and then tap Next.
Step 3 — Select Multiple Photos
Choose the images you want to include.
If Facebook asks for permission to access your photos, allow the appropriate access. If only selected photos are available, make sure the photos you need are included.
Step 4 — Tap Next
After selecting your photos, continue to the next screen.
Facebook may show editing and organization options.
Step 5 — Select + Album
Look for + Album.
Meta currently documents this option as a way to add selected photos to an existing album or create an album during the photo-sharing workflow.
If the exact wording or location is different on your version of the app, look for an album-related option within the photo composer.
Step 6 — Choose or Create the Album
If you already have a suitable album, select it.
If you need a new collection, choose the available option to create one and enter a meaningful name.
Step 7 — Review Your Photos
Facebook can also provide options for editing photos, tagging people, adding locations, and other post details.
Only add information that is genuinely useful.
Step 8 — Check Your Audience
Review who will be able to see the content before publishing.
This is particularly important when uploading personal photos from your phone because it is easy to select a wider audience than intended.
Step 9 — Tap Post
When everything looks correct, tap Post.
Allow Facebook enough time to upload the images, particularly if you selected many high-resolution photographs.
Meta notes that upload quality can depend on network conditions and recommends using Wi-Fi or a strong mobile signal for better upload quality.
How to Create a Facebook Photo Album on Android
The Android workflow is similar to iPhone, although the location of menus and permissions can vary between Facebook versions and Android devices.
Step 1 — Open Facebook
Launch the Facebook app and sign in.
Step 2 — Start the Photo Upload
From the Feed, select Photo or the equivalent photo-upload option.
Step 3 — Choose Your Photos
Select the images you want to group together. If Facebook does not show the photographs you expect, check whether the app has permission to access your device’s photos.
Step 4 — Tap Next
After choosing the photos, next step is to Continue the process further.
Step 5 — Choose + Album
Look for + Album in the photo composer. According to Meta’s current instructions, this option can be used to add photos to an album or create an album as part of the upload process.
Step 6 — Name the Album
Choose a descriptive title.
For example:
Better:New York Vacation — July 2026
Weak:Photos
The first title tells viewers exactly what the collection contains.
Step 7 — Set the Audience
Select the audience that matches the purpose of your album. For private memories, a restricted audience is generally more appropriate than a public setting.
Step 8 — Publish
Review your photos and tap Post. Keep the app open until the upload has completed if your connection is slow or unstable.
How to Verify That Your Facebook Album Was Created
Creating an album is not finished simply because you tapped Post.
You should verify the result.
Check 1 — Open Your Profile
Return to your Facebook profile after the upload finishes.
Check 2 — Open Photos or Albums
Open your photo area and locate the album.
Check 3 — Confirm the Album Name
Make sure the title is correct.
Check 4 — Open Several Photos
Confirm that the images uploaded correctly and are not missing.
Check 5 — Check the Audience
Verify that the album has the intended visibility. This is especially important for private or family photographs.
Check 6 — Test the Viewer Experience
If the album is intended for other people, open it as a normal viewer would and make sure the images, title, and context make sense.
How to Add Photos to an Existing Facebook Album
You do not necessarily need to create a new album every time you have another related photograph.
Step 1 — Open Your Photos
Go to your profile and open the album area.
Step 2 — Open the Existing Album
Select the album that should contain the new photos.
Step 3 — Find the Add Photos Option
Look for an option such as Add Photos/Videos or an equivalent control. The exact wording can change with Facebook’s interface.
Step 4 — Select the New Images
Choose the photos from your computer or phone.
Step 5 — Review and Save or Post
Confirm the upload and wait until the new images appear in the album.
Meta’s current photo-sharing workflow also allows selected photos to be assigned to an album during upload through + Album.
How to Organize a Facebook Album Professionally
Creating an album is only the first step. Good organization makes it easier for people to understand and browse.
Use One Clear Theme
A strong album normally has a simple organizing principle.
Examples:
- One trip
- One event
- One product launch
- One project
- One family occasion
- One portfolio category
Avoid mixing a birthday party, office meeting, random selfies, and vacation photographs in the same collection unless there is a clear reason.
Put the Strongest Photos First
When possible, begin with images that immediately communicate what the album is about.
- For a business event, that might be the main event photograph.
- For travel, it might be the strongest destination image.
- For a product album, it might be the clearest product photograph.
Use Descriptive Titles
A good title answers:
What is this album about?
For example:
Summer Vacation in Rome — 2026ABC Company Annual MeetingNew Product Collection — Fall 2026
Add Captions Only When They Add Context
Do not caption every photograph with unnecessary text.
A caption is useful when it explains something viewers cannot understand from the image itself.
How to Change Facebook Album Privacy
Privacy is one of the most important parts of album management.
Why Album Privacy Matters
A photograph can contain more information than you realize, including:
- People
- Locations
- Children
- Home interiors
- Vehicle information
- Travel dates
- Work details
- Personal documents
Before publishing an album, ask whether everyone who can see it genuinely needs access.
How to Review Privacy
Open the album and look for its audience or edit controls.
Facebook’s broader privacy system lets users review and adjust audience and visibility settings through Settings & privacy → Settings, although available controls can differ by profile type and content.
Do not assume that changing your general profile privacy automatically gives every album the exact audience you want. Check the album or post itself where Facebook provides a specific audience control.
How to Edit a Facebook Photo Album
You may want to change an album after publishing it.
Change the Album Name
Open the album’s available edit controls and look for the title or name field.
Enter the new name and save the change if Facebook provides that option.
Add More Photos
Open the album and use its add-photo control, or select the album during a new photo upload when the + Album option is available.
Add or Change Context
Where Facebook provides description, caption, tagging, or location controls, update only the information that remains useful.
Remove an Incorrect Photo
If one image does not belong in the collection, use the album’s photo-management options to remove it rather than deleting the entire album.
Be careful with deletion because removing a photo from an album and deleting an entire album are different actions.
How to Delete a Facebook Photo Album
If an album is no longer needed, open the album and look for its three-dot, Options, or Edit menu.
The available deletion controls can vary depending on the album and interface.
Before Deleting an Album
Ask yourself:
- Do I need these photographs later?
- Are the original files backed up?
- Do I only need to remove one photograph?
- Would changing the audience solve the problem?
- Is the album connected to other content?
If only one image is problematic, deleting the entire album may be unnecessary.
Troubleshooting Facebook Album Problems
Facebook album problems are often caused by interface changes, permissions, upload failures, or account-specific limitations.
Problem: I Cannot Find “Create Album”
Most likely cause: Facebook has changed where album creation appears in your current interface.
How to check: Start a normal photo upload and look for + Album after selecting multiple photos.
Solution: Use the photo composer rather than relying on an older Photos → Albums → Create Album tutorial. Meta’s current help documentation specifically shows + Album in the photo-upload process.
Verify: After publishing, open your Photos/Albums area and confirm that the collection exists.
Problem: Facebook Cannot See My Photos
Most likely cause: Facebook does not have sufficient access to your device’s camera roll.
How to check: Try selecting a photo and see whether Facebook displays the expected images.
Solution: Review Facebook’s photo permissions in your phone’s settings and grant the appropriate access.
Meta confirms that photo sharing requires access to the device’s camera roll.
Verify: Return to Facebook and check whether the missing photographs now appear.
Problem: My Album Is Not Visible to Someone Else
Most likely cause: The album’s audience does not include that person.
How to check: Review the album’s audience or privacy setting.
Solution: Adjust the audience if appropriate.
Verify: Ask the intended viewer to check the album again.
Common Mistakes When Creating Facebook Albums
Mistake 1 — Following an Old Interface Exactly
Older tutorials can show buttons that no longer appear in the same location.
Correct approach: Follow the current workflow available on your account and use Meta’s current help documentation as the authority for feature behavior.
Mistake 2 — Choosing the Wrong Audience
A public album can expose personal photographs to a much wider audience than intended.
Correct approach: Check the audience before publishing and after making important changes.
Mistake 3 — Mixing Unrelated Photos
A confusing album makes it harder for viewers to understand the collection.
Correct approach: Give each album one clear theme.
Mistake 4 — Uploading Every Photograph
More images do not automatically make an album better.
Correct approach: Select the strongest and most relevant photographs.
Mistake 5 — Using Generic Album Names
Names such as Photos, New Album, or Pictures provide little context.
Correct approach: Use a title that identifies the event, location, project, or purpose.
Mistake 6 — Publishing Without Reviewing
Once an album is public, you may discover duplicate, blurry, private, or unrelated images.
Correct approach: Perform a final review before selecting Post.
Expert Insights for Better Facebook Albums
The strongest album workflow is not simply upload everything and publish. Think of an album as a structured visual collection.
Use a Three-Stage Workflow
Stage 1 — Curate
Choose only relevant images.
Stage 2 — Organize
Arrange the images so the collection has a logical beginning, middle, and end.
Stage 3 — Verify
Check the title, audience, images, and viewer experience.
This approach is useful for both personal and professional accounts.
Build Albums Around a User Question
For businesses, an album should help answer something a visitor may actually want to know.
For example:
Weak album:Office Photos
Better album:Our 2026 Customer Conference
The second title gives viewers immediate context.
Do Not Confuse Organization With Reach
An album can make content easier to browse, but that does not guarantee higher organic reach, engagement, or ranking.
Treat those as separate outcomes.
Organization answers:
“Can people find and understand my photos?”
Distribution answers:
“Will Facebook show this content to more people?”
A well-organized album can improve the first without guaranteeing the second.
Which Method Should You Use?
There are two useful approaches depending on what Facebook shows you.
| Situation | Recommended Method |
|---|---|
| You see Create Album in Photos | Use the direct album workflow |
| You are on the Facebook app | Start a photo upload and look for + Album |
| You already have an album | Select that album during photo upload |
| You only need a quick multi-photo update | Use a normal photo post |
| You want long-term organization | Create or use an album |
| The album option is missing | Try the photo-upload workflow or another supported device |
The key principle is simple: use the current interface available to your account rather than relying on a fixed button location from an older guide.
Frequently Asked Questions
Can I create a Facebook photo album from my phone?
Yes. Facebook’s current mobile photo-sharing workflow allows users to select multiple photos and use + Album to add them to an existing album or create an album.
Can I create a Facebook album from a computer?
Yes. You can manage Facebook photos and albums from a desktop browser. The exact location of the album-creation control can vary as Facebook updates its interface.
Can I add photos to an existing Facebook album?
Yes. You can select an existing album during the photo-upload workflow when Facebook provides the + Album option.
Can I choose who sees my Facebook album?
Facebook provides audience and privacy controls, although the available options can depend on the content and account type. Always check the specific audience setting before publishing sensitive photos.
Why can I not see the Create Album button?
The most likely explanation is an interface difference or Facebook’s current photo-upload workflow. Try selecting multiple photos first and look for + Album. Meta currently documents this route.
Can I create an album with multiple photos at once?
Yes. Facebook supports selecting multiple photos during its photo-sharing process. You can then use the album option where available.
Can I edit a Facebook album after publishing it?
In many cases, yes. Album management can include changing information, adding photos, or managing individual images, although the exact controls vary by album and interface.
Should I make my Facebook album public?
Only if you are comfortable with the photos being visible to a broad audience. Personal, family, workplace, or location-sensitive photographs may be better suited to a restricted audience.
Is a Facebook album better than a normal photo post?
Neither is universally better. An album is generally more useful when you want to organize a related collection for continued browsing, while a normal multi-photo post is often sufficient for a quick update.
Will creating a Facebook album automatically increase engagement?
No guarantee should be made. An album can organize content and improve the browsing experience, but reach and engagement depend on many factors beyond the album format.
Read More:
How To Make Your Facebook Profile Private- A Step By Step Guide
Final Takeaway
Creating a Facebook photo album is straightforward once you understand that Facebook may provide more than one route to the same result.
On desktop, you can typically work from your profile’s photo and album area. On mobile, Meta’s current documented workflow is to start a photo upload, select your images, tap Next, and use + Album to add them to an existing album or create one.
The most important part is not simply pressing Post. Choose relevant photos, give the collection a descriptive name, select the correct audience, review the images, and verify the finished album afterward.
If Facebook’s buttons look different from an older tutorial, do not assume the feature has disappeared. Facebook frequently changes its interface, so use the current photo-upload workflow and check the available album controls on your account.